
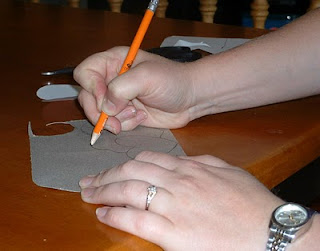
I find
 or design a simple picture with not a lot of detail. (The more detail, the less likely I am to attempt another patch.) The picture needs to be as round or square as possible. I love the internet. You can find so many options out there.
I draw the pict
 ure onto one of those iron on patches. (Yes I went back to the iron on patch. They only cost 99 cents for 2 large patches (I can usually make 4 patches out of each) and they save a lot of time. Otherwise you have to hand stitch the patch on before you sew it to make sure the patch stays where you want it. But I tell you, iron on patches are well worth their money.
I use a very fine zig-zag stitch to trace the inside of the picture. (The finer the zig-zag, the more I like it.) I do not trace the outside yet. I used to, but it really is a waste of time because I would be retracing it when I sewed it onto the pants. (Sometimes if the picture is simple enough, you can skip this step and sew the inside along with the outside onto the pants. The patch shown in the picture really was simple enough but for more detailed pictures like the Transformer patches, it is much easier to work with a small patch when sewing the inside than a large pair of pants. Ok so was that confusing enough?)
Then I cut around the outside of the picture.

I take out the seam of the pants in the area of the hole. You do not have to undo the entire pant leg, just a small hole will work. With my first pair, I tried not to take out the seam, but instead used the foot hole. Believe me, it actually saves a lot
 of time and frustration to make the hole. Also, I make the hole in the seam that does not have two thread lines showing on the outside. This is usually the inside seam of the pants, . . . but not always.
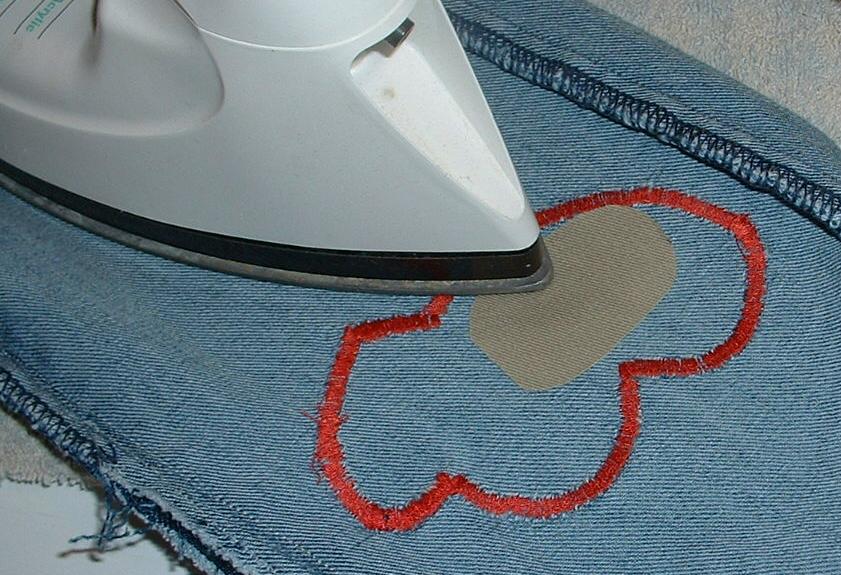
Next, I iron the patch onto the pants.
Then I use
 a wider, very fine zig-zag stitch to go around the outside and sew the patch onto the pants. The outside of the zig-zag stitch should barely go off the patch. Most of the stitch should be on the patch. I have made the mistake several times of not using a wide enough stitch around the outside and letting the stitch get too close to the outside of the patch. In a short time, the patch will come out from under the stitch and I've had to redo it.
I Cut all leftover strings and stitch the pant seam back up.
 I Cut a small piece of the iron on patch, slightly larger than the hole in the pants, and iron this onto the INSIDE of the pants. (I found that if I patch the inside and outside of the pants, the patch will last a lot longer. (I hate it when my cute patch gets a hole in it.) Patching the inside increases the strength of the patch and keeps your child from getting his/her foot snagged in the hole.)
And there you have it. Patched pants that your kids will want to show off.
Now my kids get excited when they get a hole in their knee. I don't know how excited I am though. The whole process takes about an hour . . . now.
Now my kids get excited when they get a hole in their knee. I don't know how excited I am though. The whole process takes about an hour . . . now.
I have made pants with the Transformer signs, dinosaur patches, fish and snail patches, flower patches, even a Super Tux patch, (that one was tricky) and just recently, a Winnie the Pooh one. But that one I cheated on. There is no way I could sew a cute picture of Pooh, but I had a pair of shorts that had Pooh on it. The shorts had gotten too close to some Bleach which had worn holes in them, but Pooh still looked great. I cut him out and sewed him onto the pants. That was the easiest patch I ever made . . . and cutest. (I don’t have a picture of it because my son is wearing them right now and he is at school.)

My sewing machine is NOT fancy, or new. In fact, it is a dinosaur. So yes, even you can do it. My aunt bought my machine . . . used . . . back when she was going to college. After she was done with it, she gave it to my mom who used it for many year. When I went off to college, my mom gave it to me, and I have been using it since . . . for many years. My husband has had to resurrect it a few times but it keeps ticking on. My only pet peeve is that the string breaks or the bobbin clogs up every few inches that I sew. It makes it extremely difficult, but not impossible, to make a nice, even line.
A quick tip: do not let the holes in the pants get too big. At the first sign of a hole forming, I take the pants away to be fixed. If the hole gets too big, it becomes very difficult to make a patch that will fit it. If the hole stretches all the way from side to side, don’t waist your time , just make them into shorts.
Oh and one more thing . . . The more contrast there is in color between the patch and the pants, and the thread and patch, the cuter it seems to be. I wish I had used a brighter color of thread on those dinosaur egg patches.